DIY Bleach Tie Dye

DIY Bleach Tie Dye:

So, I found this post while searching for ways to make my black top less boring and came across this great idea from HONESTLY WTF... I'm posting this while my top is still in the washing machine so I don't have any pictures yet but I'll be sure to post it soon. So meanwhile here is the tutorial:

What you'll need:

 a 100% cotton black shirt 
- a few cups of bleach
- a bucket
- a pair of gloves
- a few rubber bands
- 2 flat shaped objects used for binding


How to do it:
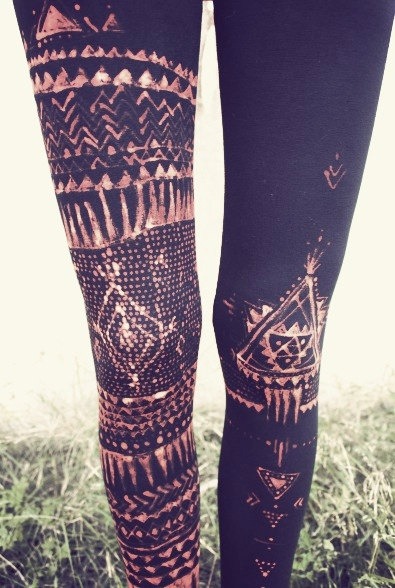
1. To make a grid-like pattern, fold the shirt like an accordion and bind it between two pieces of wood or other flat shaped objects. 
2. Hold the shirt in place by wrapping a series of rubber bands around the bind. Anything used to bind the clothing will prevent the bleach from penetrating, and the rest of the exposed fabric will bleach and turn color.


3. Before you start bleaching, make sure you are wearing gloves and working outdoors or in a well ventilated area. 
4. Dilute approximately 4 cups of bleach with 1 cup of water. Submerge the shirt into the bleach for only a couple of seconds. Watch it very carefully because depending on the thread count of the clothing, the color can turn very quickly and the bleach may start to erode the fabric. 
5. As soon as the black transforms into a rusty brown color, immediately remove it from the bleach. Give it a quick rinse, unbind it, and then hang it.


6. The rusty brown color will slowly fade into a beautiful lighter shade as it begins to set. Once its dry, wash the shirt in a washing machine.


Your bleach tie dye shirt is ready to wear!


Enjoy!

http://honestlywtf.com/diy/diy-bleach-tie-dye/

Bleach Print Leggings

Bleach print leggings:

Have a boring pair of leggings lying around somewhere? Why not try this super great and simple idea. It won't take long and i assure you the results will be hot!

What you'll need:

Dark-colored leggings (Or really any other article of clothing!)
- Bleach pen
- Cardboard (to put underneath the leggings so the bleach doesn’t bleed through)
How to do it:
1. Place the cardboard inside of the leggings, and make sure the leggings are straight! Next smooth the surface clean of wrinkles.
2. Find a design you like for inspiration, find a stencil, or just start using the bleach pen to free draw on the leggings!
Tip: The bleach may spread, so be aware and try not to make the lines too thick!
3. Let the bleach sit. The longer you let it sit the whiter the design will be so keep this in mind.
4. When you are ready take the leggings to the sink and rinse the bleach gel off in cold water. Make sure you wash it a few times to make sure all of the bleach is off.
5. Throw the leggings into the washer and dryer. You will not need soap for this step, just make sure the washer is on cold.


Enjoy!

DIY Distressed Denim

DIY Distressed Denim:

Are your jeans getting boring, I know mine are. I thought I could try something different and found this tutorial at swellmayde.com
It is just perfect for my old pair of jean sitting at the back of the closet.
Why not try it youself?


What you'll need:

- denim jeans
- sandpaper
- utility knife
- tweezers
- cardboard

 How to do it:


1. Rub sandpaper several times over the area you would like to add distressing to.

2. Cut straight horizontal slits into the denim about 1/2" apart to the front side of the denim in areas where you rubbed sandpaper on. (Tip: Add a piece of cardboard inside the pant leg of where you are cutting to prevent cutting through to the backside of the jean). Once you have a layout that you like, throw the denim into the washing machine using cold water. Then, fully dry in the dryer.


3. Once it is out of the dryer, you can make the distressing look a little more natural. Using the tweezers, in areas where you cut slits, pull the indigo fibers, leaving the white horizontal fibers


Enjoy!

Patched Jeans

I havn't actually made this yet but it looks pretty simple. Get some patches of leftover fabric and sew it onto an old pair of jean.


This will be on my to do list.

Flowy Tank Top

Flowy Tank Top:

What you'll need:

- Shirt
- Tank Top
- Scissors
- Sewing Machine
- Thread
- Pins


How to do it:

1. Lay a tank over the top and trace or free hand it and mark where you want to cut out the tank from the top.
2. Cut the straps and neckline out.
3. Cut the bottom to be rounded, then hem. You choose how wide you want the hem.
4. Hem the straps and neckline by folding it under just smaller then a quarter of an inch, then fold again a quarter inch and sew. Or you can just fold it under once if you don’t mind the fraying.


I love this so much! It's just a great idea!

Enjoy!

Simple Vintage Jeans

Simple Vintage Jeans:

Here's a quick idea it will take you just 5 minutes (if your fast at sewing.)

What you'll need:

- a pair of old ripped jeans
- thin black lace
- double pin, thread and needle

How to do it:

Sew the thin black lace beneath those torn jeans for a vintage look and finished!


So? What do you think? Too long?

Enjoy!

DIY American Flag Cuff Jeans

DIY American Flag Cuff Jeans:

With the 4th of July around the corner, I knew it was time for a patriotic DIY!

What you'll need:

- A pair of old jeans (preferably old boyfriend- style jeans)
- An american flag printed item
- Safety pins, needle and thread


diy american flag cuffs


How to do it:


american flag cuff

1. Turn the jeans inside out and use safety pins to attach the fabric to the bottom portion of the leg. I used stripes on one leg and stars on the other, and sewed the fabric up to about mid-calf.

diy american flag cuffdiy american flag cuff

2. Turn your jeans right-side out and roll up the cuffs to reveal your new patriotic pants!

Post image for DIY American Flag Cuffs
Enjoy!

http://blog.freepeople.com/

Popcorn Nails by Nailed It

Here is the tutorial on how to get Popcorn Nails:

What you'll need:

- White Nail Polish
- Red Nail Polish
- Dotting Tool
- Light Yellow Nail Polish
- Darker Yellow Nail Polish

How to do it:


http://blognailedit.blogspot.com/2012/01/popcorn.html

These are just so great!

Enjoy!

Repurposed Lace Scrap Tennies


Repurposed lace scrap tennies - Dream a Little Bigger

Repurposed Lace Scrap Tennies:

What you'll need:

- Lace in many pattern
- fabric glue
- x-acto knife
- scissors
- tennies in your choice of colour

How to do it:

1. You can either purchase shoes that are already the color you like, dye a new pair of white ones, or if you have some kind of messed up white tennies you can dye them a medium to dark shade to cover the marks.
Repurposed lace scrap tennies - Dream a Little Bigger
2. Figure out where you want to place your first piece of lace. I put a strip of the largest right over the middle of the toe for big visual impact. Squeeze out some fabric glue and use a qtip or your finger to smooth it out. Place the lace on top and pat down to stick well to the glue.
Repurposed lace scrap tennies - Dream a Little Bigger
3. Continue placing lace with your shoes side by side. Try to mirror the placement as closely as possibly. Continue up making the lace cross over the gap made where the shoe divides for laces. When you get past that area, you can use small scraps to cover the sides. Continue placing your lace until you reach the heel. There place one piece straight up and down.
Repurposed lace scrap tennies - Dream a Little Bigger
4. After the shoes have dried and the glue is fully set, trim around the top of the sneakers to cut the excess lace. Cut the lace down the tongue to separate the two separate sections for the left and right eyelets.
Repurposed lace scrap tennies - Dream a Little Bigger
5. Use the fabric glue to go around and stick any piece that isn't adhered to the shoes. You can place the glue underneath and tamp the fabric down, or place the glue on top and rub it in.
Repurposed lace scrap tennies - Dream a Little Bigger
6. Use an x-acto knife or a pointy screwdriver to cut out holes for the laces to run through the eyelets. Lace the shoes as you go.
Repurposed lace scrap tennies - Dream a Little Bigger
That's all for that! I absolutely love my new kicks...
-Repurposed lace scrap tennies - Dream a Little Bigger
Enjoy!

Magic Bottle

Magic Bottle:

What you'll need:


- A clear, empty bottle
- distilled water
- glycerin
- glitter, flakes, sequins, light plastic beads... ( anything that sparkles and floats)
- some pretty twine or lace to wrap around the bottle


How to do it:

1. Pour distilled water and glycerin into the bottle

2.  Add glitter flakes, sequins and whatever else you want in your bottle and close the bottle.

3. Wrap pretty lace or twine or both around the bottle neck

4.  If you're giving your bottle away you might want to add a tag to tell the recipient
    what this bottle is about.

Printable Circus Tent Gift Box

Sorry, I only found the printable version in french.

http://www.unbeaujour.fr/wp-content/uploads/2012/11/DIY-UBJ-chapiteau.pdf

What you'll need:

- printable circus tent
- double sided tape
- scissors and x-acto knife
- a match
- sweets or other stuff you could fill the box with

How to do it:

1. This printable has a small flag that you can easily edit on an editing programme like Pixlr or Photoshop to write your name or the date. I advise you to use Bristol Board/ Paper. 

2. This next step is harder. It requires a lot of cutting. Use a pair of scissors for the round edges (the roof) and the little angles and the x-acto knife for the straight lines. 

3. To form the folds, there is only one solution: mark them with the x-acto knife. Go slowly and carefully. For practice you can try it on a blank paper.

4. Now it's time to assemble everything. This is quite simple. First the roof (Glue the small tab to close), then the body of the box (same thing). The background is a bit tedious but stick to the double-sided tape, it makes it much easier.

5. All you have left is your little flag. Cut it out and fold it carefully so then the edges are face to face. Glue the match to your little flag with your double sided tape. 

6. Insert the match flag into the roof of your circus tent. Add sweets and voila!


Enjoy!

DIY Feather Crown

DIY Feather Crown:

What you'll need:

- Fabric or lace
- Glue gun
- Different size feathers


How to do it:

FEATHER CROWN2

1. Cut strips of fabric or lace about 1 inch or thinner in width and about 30 inches long. Here, I have used four strips of fabric.

2. Starting at about 8-10 inches down, braid your strips together. You will want to leave those loose ends long so you can tie them together when you're done.

3. When you reach the end, wrap one of your strips around the ends and hot glue it in place. Do this to both ends.

4. Start hot gluing your feathers onto the back of your braid. Start with the shortest feathers and then add the taller ones on top.

5. Add a piece of fabric or felt to the backing of the feathers to finish it off. Hot glue it on. Now you're ready to tie it around your head.

Now you can rock it!

Enjoy!

Chocolate Leaf

Chocolate Leaf:

What you'll need:

- Chocolate
- Cabbage leaf
- ice cream (optional)

How to do it:

This is super simple and doesn't require much skills. Simply melt your chocolate then paint it on the cabbage leaf. Let it harden then gently peel of the leaf.
You are left with a beautiful bowl great to serve ice cream, fresh fruits or mousse.


Enjoy!

DIY Bird Cage Light


DIY Bird Cage Light:

What you'll need:

- An old lamp shade
- hardware cloth
- some floral wire
- wire cutters
- gloves
- gold spray paint
- birds from the dollar store
- branches
- glue gun

How to do it:


1. Remove the fabric portion of the lamp shade until there is just the frame for both the top and bottom.


2. I cut the hardware cloth to size, letting it overlap just a little, using some heavy duty wire cutters.  I would highly recommend wearing gloves for this step. 


3. Wire everything together to secure then spraypaint the whole thing gold.

4. Gather some birds and glue gun them to the branches you've picked up. Place the branches through the holes of the hardware cloth. 


Voila!


Enjoy!

Oreo Cupcakes + Retro Oven Cupcake Box (Printable)

Oreo Cupcakes:

What you'll need:

- 75g butter
- 245g sugar
- 2 eggs
- 205g plain flour
- 1 tbsp baking powder
- 1 pinch salt
- 205ml milk
- 75g crushed Oreo cookies

How to do it:


1. Pre-heat your oven to 170 degrees/Gas mark 3
2. Cream the butter in a large bowl until soft. Add sugar and whisk until combined and coming away from side of bowl
3. In a jug whisk your eggs and slowly add to butter and sugar mix, incorporating fully before adding more
4. Sieve flour, salt and baking powder together, add crushed Oreos and add and whisk half to wet batter with half of your milk until incorporated. Then scrape down the sides of your bowl and add the rest of the dry cake mix and milk until combined.
5. Fill your 12-cupcake cases ¾ of the way and bake in the oven for 20-25 minutes until cooked.
Enjoy!
+ Retro Oven Cupcake Box by Claudine Hellmuth:
An easy to make retro oven cupcake box with removable cupcake tray. Can also be used as a gift box, party centerpiece, favor box, paper toy, or just as fun decoration for your home! 

Included this kit are FIVE oven colors, a removable cupcake tray, cupcake flags with text you can edit right in your PDF (no special software needed!) and darling little oven mitt gift tags to add that finishing touch to your ovens!

This kit packaged as a 19 page high resolution PDF file that comes as an INSTANT download delivered to you with a link via email. You will be ready to get crafty in minutes! These are original designs created by artist and illustrator Claudine Hellmuth.
Price: $4.99


Romwe Generic Fall & Winter

DIY Map Shoes

DIY Map Shoes:

What you'll need:

- a pair of canvas shoes
- large map or atlas
- mod podge
- a paintbrush
- newspapers ( optional)

How to do it:

1. To keep the shape of your shoes, stuff them with newspaper.

2. Brush some Mod Podge onto your shoes. Concentrate on small areas at a time.

3. Tear some pieces of your map and place it on the freshly glued area. Continuously add more Mod Podge on the shoe and seal the map pieces. Repeat the steps until both shoes are covered.

4. Let the Mod Podge dry for at least an hour and then your shoes are ready to wear. Your shoes might be a little crunchy sounding for the first few wears.


Enjoy!

Black and White Ice Cream Tart

  • Black and White Ice Cream Tart:

  • What you'll need:

  • 24 chocolate sandwich cookies (oreos about 10 ounces)
  • 1 tablespoon butter, melted
  • 2 pints vanilla ice cream, softened

How to do it:


  1. Coarsely chop 6 cookies; set aside.
  2. Make crust: Process 10 cookies in a food processor until fine crumbs form. Add butter, and process until combined. Transfer to a 9-inch tart pan with a removable bottom. Using the bottom of a measuring cup or glass, press crust firmly into pan. Top with a circle of 8 cookies.
  3. Dollop ice cream by the cup all over crust. Using a rubber spatula, gently spread. Sprinkle edge of ice cream with chopped cookies, forming a border. Freeze until firm, at least 4 hours, or cover with plastic wrap and freeze, up to 1 week.
  4. To unmold, run a warm, damp cloth or sponge around outside edge of pan. Lift removable bottom with tart out of pan. Transfer to a serving plate, and cut into slices.

    Cook's Note:

    Let ice cream stand at room temperature 30 minutes, or microwave it in 10-second increments until spreadable.


Enjoy!

Cookies and Cream Milkshake

Cookies and Cream Milkshake:

What you'll need:

  • - 5 chocolate sandwich cookies (oreos)
  • - 2 cups vanilla ice cream (slightly softened)
  • - 14 cup milk
How to do it:

  1. 1. Place 3 cookies in a ziplock bag. Seal bag and crush cookies with a rolling pin. 
  2. 2. In a blender, combine ice cream and milk. Blend until smooth. 
  3. 3. Add crushed cookies and pulse a few times just to blend. 
  4. 4. Pour into 2 tall glasses and garnish each with a cookie (or a dollop of whipped cream drizzled with chocolate syrup, if desired).
Cookies-and-Cream Milk Shakes Recipe

Enjoy!

Oreo Cookie Truffles


Oreo Cookie Truffles:

What you'll need:

- 1 (16 oz) package of Oreo cookies, divided
- 1 (8 oz) package of cream cheese, softened
- 1 package of almond bark (or baking chocolate, whatever you prefer), melted


How to do it:


  1. Crush 9 of the cookies to fine crumbs in food processor; reserve for later use. (Cookies can also be finely crushed in a resealable plastic bag using a rolling pin.) Crush remaining 36 cookies to fine crumbs; place in medium bowl. Add cream cheese; mix until well blended. Roll cookie mixture into 42 balls, about 1-inch in diameter. Put balls in fridge for 30 minutes to an hour.
  2. Dip balls in chocolate; place on wax paper-covered baking sheet. (Any leftover chocolate can be stored at room temperature for another use.) Sprinkle with reserved cookie crumbs.
  3. Refrigerate until firm, about 1 hour. Store leftover truffles, covered, in refrigerator.
How to How to Easily Dip Truffles:
  • Place truffle ball in melted chocolate to coat; roll if necessary. Lift truffle from chocolate using 2 forks (this will allow excess chocolate to run off) before placing on wax paper.

Enjoy!
Shop SheIn for the latest in Fall and Winter Fashions